Search through blog..

Tuesday, December 16, 2014

Issues with Deleting Dynamics AX In Bound port

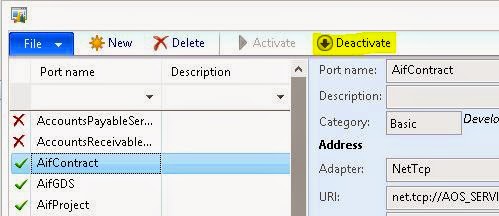
First thing to note is to delete a Dynamics AX In-Bound port, you must ensure that the port is Deactive. In case you try to delete an Active port, you will get an error message similar to below.
The port 'InBound port name' must be undeployed before it can be deleted.

Just click button Deactivate after selecting the port you want to delete.
Path: System administration > Setup > Services and Application Integration Framework > Inbound ports


Another issue which you might have encountered while trying to delete an InBound port is the error message – “Port cannot be deleted while dependent Gateway queue exist. Delete dependent Gateway queue and try again.”

This happens when you have dependent records in Queue manager. The solution is to go to Queue manager and delete all the records which are using the port you want to delete.

Path: System administration > Periodic > Services and Application Integration Framework > Queue manager


Monday, September 1, 2014

Code: X++ script to disable AX users

If you are looking for script to quickly disable AX users. This way you can keep people out of the AOS without actually needing to remove the user. 
 
Three approaches for the code:
1. Simple Job to disable the specified user in UserInfo table.
static void disableUsers(Args _args)
{
    UserInfo userInfo;
    ;
    //a00008 is the user id which we want to disable.
    while select forUpdate userInfo where userInfo.id == 'a00008'
    {
        if(userInfo)
        {
            ttsBegin;
            
            userInfo.enable = 0;
            userInfo.update();
            
            ttsCommit;
        }
    }
}

 
2. A step more, the below job uses a Container to store multiple user entries and disables all of them in one go.  
 
static void disableListOfUsers(Args _args)
{
    UserInfo    userInfo;
    //list of users to be disabled
    container   userList = ['a00225', 'a03559', 'a03971']; 
    int         x, noOfRecords;
    str 8       userId;
    ;
    
    noOfRecords = conLen(userList);
    for(x=0; x<noOfRecords; x++)
    {
        userId = conPeek(userList, x);
        while select forUpdate userInfo where userInfo.id == userId
        {
            if(userInfo)
            {
                ttsBegin;
                userInfo.enable = 0;
                userInfo.update();
                ttsCommit;
                info(strFmt("%1 : User updated", userInfo.name));
            }
        }
    }

}

 
3. Excel (csv file) having user details is a prerequisite here, which can be generated using Excel Addins (Ctrl+T from Users form). This job reads saved .csv file from specified location and disables all user list in the file. 
static void disableUserFromCSV(Args _args)
{
 
    #File   //needed for use of Macro #io_read
    UserInfo            userInfo;
    CommaTextIo         commaTextIO;
    FileIOPermission    permission;
    container           userList;
    str                 fpath;
    str 8               userId;
    ;
 
    //File consisting of list of users with columns {userid, username, enable}
    fpath = "D:\\Temp\\Code\\UserList.csv";
    permission = new FileIOPermission(fpath, #io_read);
    permission.assert();
 
    commaTextIO = new commaTextIO(fpath, 'R');
    commaTextIO.inRecordDelimiter('\n');
    commaTextIO.inFieldDelimiter(';');
    userList = commaTextIO.read();
    userList = commaTextIO.read(); //To overwrite the header read.
    while(userList)
    {
        userId = conPeek(userList, 1);
        
        while select forUpdate userInfo where userInfo.id == userId
        {
            //strReplace() is used to replace the Carriage return with space, so that the validations act properly
     //Checking if enable is already False, if it is control shouldn't go into the loop.
            if(userInfo && strReplace(conPeek(userList,3), '\r', '') == "TRUE") 
            {
                ttsBegin;
                userInfo.enable = 0;
                userInfo.update();
                ttsCommit;
                info(strFmt("%1 : User updated", userInfo.name));
            }
        }
        userList = commaTextIO.read();        
    }
}

Tuesday, August 5, 2014

Difference between InMemory and TempDB tables in AX 2012

Basically in AX2012 there are two types of Temporary tables, (i)TempDB tables and (ii)InMemory Tables.

Basic differences between them are:

InMemory tablesTempDB tables
1. Holds data temporarily in client or server tier1. Holds data temporarily in database till the scope is valid
2. These tables can't be stored in Database2. These tables are stored in the database
3. Can't apply security3. Can apply security
4. We cannot use InMemory table buffers4. TempDB table buffer can be used in coding

TempDB tables

We call them TempDB tables because their TableType property value is TempDB. This value comes from the TableType::TempDB enum value. The TableType property value can be set at AOT > Data Dictionary > Tables > MyTempDBTable > Properties > TableType.
All types of temporary tables are automatically dropped by the system when the table variable in X++ goes out of scope. A TempDB table is NOT dropped when you set its record buffer variable to null.


Capabilities of TempDB Tables:
  1. Can be joined with other AX tables
  2. Can be either per company or global.
  3. Can be used from Enterprise Portal by using .NET Business Connector.
  4. Can have foreign key columns.
  5. TempDB tables can be instantiated from the client or server tier.
  6. Can have indexes columns.
  7. Can have methods, but cannot override.
  8. Usable as a query
  9. Transaction support.
  10. No configuration key is required.
Limitations of TempDB Tables:
  1. Cannot be a valid time state table.
  2. Cannot have any delete actions.
  3. No Record Level Security (RLS).
  4. Cannot use the Table browser form.
  5. Cannot be in a table collection.
  6. No view support.
Lifetime of TempDB Tables:
A TempDB table is instantiated in the underlying database management system when the first SQL operation is sent to the database system from the AOS. (select, insert, update, or delete)


The situations that cause a TempDB table to be dropped are:
  1. Variable goes out of scope.
  2. Controlled restart of the AOS.
  3. Restart of the database system.
  4. Closure of the AX32.exe client.
  5. From Online Users form.
Example to Illustrate difference between TempDB tables and InMemoryTables:

//This example is done in AX 2012 R3 CU8 6.3.1000.309
static void Aj_TempdbTableUsage(Args _args)
{
    //Aj_MyTempdbTable xrecMyTempdb;
    Aj_MyInMemoryTable xrecMyTempdb; //Just to illustrate te differene between InMemory and TempDB tables
    CustTable xrecCustTable;
    TableType tableTypeEnum;
    str stringWork;

    Global::info(strFmt("Start of main.")); //<<%1>>", DateTimeUtil::utcNow()));
    xrecMyTempdb.AccountNum = "DE-001";
    xrecMyTempdb.doInsert();
    xrecMyTempdb.AccountNum = "US-001";
    xrecMyTempdb.doInsert();

    tableTypeEnum = xrecMyTempdb.getTableType();
    stringWork = "Aj_MyTempdbTable.TableType is: " + enum2Str(tableTypeEnum);
    info(stringWork);

    while select *
            from xrecCustTable
                JOIN xrecMyTempdb //Illustrating the join capabilities
            where
                xrecMyTempdb.AccountNum == xrecCustTable.AccountNum
    {
        stringWork = xrecCustTable.AccountNum
                + " , "
                + int2Str(xrecCustTable.MandatoryCreditLimit);
        info(stringWork);
    }
}
/*** Infolog outputMessage (05:21:28 pm)
Start of main.
MyTempdb.TableType is: TempDB
DE-001 , 0
US-001 , 1
***/


Output:


TempDB Tables for Disabled Tables
You can disable a regular persisted database table by disabling the configuration key that controls the table. Disabling the key causes the system to automatically create a TempDB style of temporary table that matches the fields and schema of the database table. This temporary table exists in the underlying SQL Server database and is managed by the Application Object Server (AOS).
The purpose of automatically creating this TempDB table is to enable AOT objects that reference the disabled table to continue to compile and run. You can read and write to this TempDB table even though the configuration key is disabled.
Note: All table buffer variables inherit the methods of the xRecord class. One such method is setTmp, which creates an InMemory temporary table that has the same schema as the regular table. However, the setTmp method cannot create an InMemory table from a TempDB table. You can call the method isTempDb to determine whether the setTmp method is available.


InMemory tables

The second type of temporary table is the InMemory table. We call them InMemory tables because their TableType property value is InMemory. This value comes from the TableType::InMemory enum value. The TableType property value can be seen at AOT > Data Dictionary > Tables > MyInMemoryTable > Properties > TableType.

Note:
In Microsoft Dynamics AX 2009 and earlier versions, InMemory tables were called temporary tables. Now there are two kinds of temporary tables, namely InMemory tables and TempDB tables. To avoid confusion we do not use the phrase temporary tables to refer to just InMemory tables or to just TempDB tables.

Tier: InMemory tables are instantiated in the active memory of which ever tier the process is running on, either the client or the server tier. InMemory tables are never represented in the database management system.
An InMemory table is held in memory until its size reaches 128 KB. The dataset is then written to a disk file on the server tier. The disk file for an InMemory table has the naming convention $tmp<nnnnnnnn>.$$$.


Scope: An InMemory table is instantiated when the first record is inserted. The instantiated InMemory table continues to exist only while a record buffer variable that references the table exists. The memory or disk space for the InMemory table is de-allocated as soon as the record buffer goes out of scope.

Indexes: can be defined on an InMemory table just as you would a persisted table. If an InMemory table is created by copying a persisted table, the indexes are also copied to the InMemory table. Indexes are useful for quickly retrieving data from InMemory tables, especially if the InMemory table data is in a disk file.

A Simple example:  

static void Aj_MyInMemoryTableUsage1()
{
    Aj_MyInMemoryTable custTmpLedger;
    ;
    custTmpLedger.Name = 'customer tmp 1';
    custTmpLedger.AccountNUm = "C0000001";
    custTmpLedger.insert();

    while select custTmpLedger
    {
        info(strFmt("Name: %1, AcccountNUm: %2", custTmpLedger.Name, custTmpLedger.AccountNUm));
    }
    custTmpLedger = null;
}


Output:


More details on InMemory Tables Vs. Containers to follow.

Monday, June 2, 2014

What and how: Configuring Account structures.

What are Account structures?
Account structures can be defined as a correct combination of valid accounts and financial dimension values, based on the requirement. This also includes setting up rules to specify how the accounts and dimension are related.
Just to give you the background, whenever we post a transaction in Dynamics AX, the accounting is done in the Main Account, however the accounting can also be done in several financial dimensions. And the Account structure allows us to define valid combinations of main account and financial dimensions.
 
Configure account structures form (in Ax2012):
The "Configure account structures" form is used to create the Account structures. As mentioned above, Account structures consists of 'Main Accounts' and can include 'financial dimension' segments. So in this form, we need to define the valid combinations, which together with the main accounts, form (become) a Chart of Accounts (COA)
 
In the "Configure account structures" form, the whole account structures can be viewed in the below ways.
  • Horizontally - View the columns that show the dimensions that make up the structure.
  • Vertically - View the hierarchical visualization of the rules that describe how the combinations behave.
So by setting up the correct combinations of multiple account structures in this form, we can track information for specific accounts without affecting the information in other accounts.

Path: General Ledger > Setup > Chart of account > Configure account structure


Account structure elements: (showed in the above snapshot)
  1. Active account structure
  2. Draft account structure
  3. Account structure segment
  4. Filter button
  5. "Add segment" button
  6. Action menu
  7. "Add %1 note" button
 
Below are some Account Structure terms and definitions.
  • Account structure: A structure that defines the valid combinations of main account and dimension values.
  • Segment: is each column in the Configure account structures form. Segments consist of main accounts or financial dimensions.
  • Filter button: A button that opens the 'Which values are allowed for the %1 field' form, where you can specify the values that are allowed for each segment.
  • Action menu: A menu icon that is displayed next to segment rows. Click the Action menu to set active dates and to copy, paste, delete, or move segments.
  • Combination: The arrangement of account segments, advanced rules, and criteria.
  • Advanced rule: A relationship principle that helps make sure that dimension values are entered correctly, and are filtered and validated according to the dimension structure. Advanced rules are defined for each account structure.
  • Financial dimension: An attribute that additionally defines an entity. Financial dimensions are basically data classifiers that are used for financial reporting. Financial dimensions identify information such as the purpose, cost center, and department.
  • Ledger account: The combination of main account and other dimension values, as defined by the chart of accounts, and which classifies financial activity.
  • Main account: The type of record—asset, liability, revenue, expense, or owner’s equity—that is used for recording individual transactions in an accounting system.
 
 The above information provides quite basic information and guidance of where you can locate the form and what do various terminology and elements mean. Below are few links which you can browse for more details information on the Account structures functionality.
  • For More details about "Configuring Account structures" and examples to work with: Click here
  • For More details about: Planning your "Chart of accounts" in AX 2012
Good luck. 

Saturday, April 5, 2014

AX Menu items and how to create menu item

Menus Items
You can use menu items to activate application objects from the user interface.
Three types of menu items can be created:
• Display - used for forms
• Output - used for reports
• Action - used for running processes
Display Menu Items
Are used to open objects that appear on the screen, typically forms. For example, clicking the Customers menu item in the Accounts Receivable module opens the CustTableListPage form. This Display Menu item points to the Form object CustTableListPage.
There are two important Properties to notice.
• Object type = Form
• Object = CustTableListPage
 
How to: Create a Menu Item
Task: To create a menu item to open the AJ_BookTypeForm
To understand the example scenario - Go here
1. Open the AOT, expand the Menu Items node.
2. Open a second AOT and locate the AJ_BookTypeForm
3. Drag the AJ_BookTypeForm form to the Display node of the Menu Items node. A new display menu item is created.
4. In the properties sheet of the new menu item, set the label property to "Types of books".
5. Save your changes.

How to: Add a Menu Item to the Area Page
Task: to add the menu item created in the previous procedure to the area page. The main menu is comprised of a number of area pages. You will add your menu item to the AccountsReceivable area page.
1. Open the AOT, expand the Menus node.
2. Expand the AccountsReceivable menu.
3. Right-click the Setup sub-menu, and select New > Submenu. A new submenu Submenu1 is created.
4. In the properties sheet for the new submenu set the name property to "Library", and the label property to "Library details"
5. In a second AOT, locate the AJ_BookTypeForm menu item created in the previous procedure.
6. Drag the AJ_BookTypeForm menu item to the Library submenu.
7. Save your changes to the AccountsReceivable menu.
8. Open a new application workspace. The new submenu and the menu item are visible in the Accounts Receivable menu.


How to: Create a Form

To create a form that will be used to view, create and edit records in the AJ_BookTypeTable.

1. In the AOT, right-click the Forms node and select New Form.
2. Rename the form to AJ_BookTypeForm.
3. In a second AOT, locate the table AJ_BookTypeTable.
4. Drag the table AJ_BookTypeTable to the DataSources node on the AJ_BookTypeForm
5. Expand the Designs node on the AJ_BookTypeForm.
6. Right-click the Designs node and select New Control > Grid. A new Grid control is created.
7. Expand the DataSources > AJ_BookTypeForm > Fields node.
8. Drag the fields AJ_BookTypeID and Name to the grid control.
9. On the properties sheet for the Design node, in the Caption property, enter "Type of books".
10. Save your changes to the form.
To understand the example scenario - Go here 

Wednesday, April 2, 2014

How to: Create a Relation

Use this step procedure to create a relation between the AJ_SubGenreTable and the AJ_BookTypeTable. The Sub-genre is related to the BookType table.

For example, the Sub-Genre 'Poems' can be only related to the record "Poetry" in the AJ_BookTypeTable table. You should not be able to have a "Novels" as Sub-genre for "Poetry".
To understand the example scenario - Gohere
To understand more details about types of relations: Gohere.
1. In the AOT, locate the AJ_EDTBookTypeID EDT.
2. Right-click the AJ_EDTBookTypeID EDT and select Properties.
3. In the ReferenceTable property enter AJ_BookTypeTable.
4. Close the properties sheet.
5. Expand the AJ_EDTBookTypeID node.
6. Right-click the Table References node and select New > Table Reference. A new table reference is created.
7. Right-click the AJ_BookTypeTable Table Reference and select properties.
8. In the related field property, enter AJ_BookTypeID
9. Close the property sheet and save your changes to the EDT.
10. If the database synchronization dialog appears, click Yes.
11. Drag the AJ_EDTBookTypeID EDT to the field node on the AJ_SubGenreTable
12. When prompted to add the ForeignKey relation from the EDT, click Yes. This will automatically create the relation between the AJ_SubGenreTable and the AJ_BookTypeTable.
13. Rename the AJ_EDTBookTypeID field to AJ_BookTypeID.


Note: Relations can also be added manually by right-clicking the relations node on the table.
However when you create the reference on the EDT and set it as a primary key, once the EDT is added to a table, the system will prompt to add the reference automatically.

What are AX Table relations?

Relations between tables are used to:
* Associate rows in one table to rows in another table.
• Enforce business rules across tables
• Create auto joins in forms (join one table to another table).
• Look up values in other tables (using lookups and the View Details command).
• Validate data by providing constraints
• Automatically propagate changes from one table to another by defining cascading relations.
• Generating field help (hover over a field, and data from the related table is displayed).

Relationships can be created between tables using MorphX
• These relations are defined within the Microsoft Dynamics AX application and not at the physical database level.
• Relations govern the relationships between data in different tables such as foreign key relationships.
• Foreign key relationships between tables are always formed from the parent table.

Under the relations node you can create different types of relationships between the parent table and other tables in Microsoft Dynamics AX.
Normal: Specifies related fields in another table. Multiple fields can be included in this relation.
For example, table LogisticsPostalAddress has a relation called State that defines the relation to the LogisticsAddressState table. The values allowed in the state field are limited depending on which country is entered.
Field fixed:Specifies related fields that restrict the records in the primary table. The fixed field is normally an enum.
Related field:Fixed specifies related fields that restrict the records in the related table. The related fixed field is normally an enum.
ForeignKey: Specifies a correspondence between a foreign key field in the present table to the primary key field in another parent table. A ForeignKey can be a PrimaryKey or a Single Field Altenate Key.

When it is a Primary Key, the relation is on the primary key field, for example customer account. When it is a Single Field Alternate Key, the relation is on the surrogate key, which is usually the RecId.

To see an example on: How to create a relation - Go here

How to: Create an Index and set it as primary

How to: Create an Index

Use the following procedure to create a new index on the AJ_BookTypeID field on the AJ_BookTypeTable
NOTE: A field of data type memo or container cannot be used in an index.

To understand the example scenario - Go here
1. Locate the AJ_BookTypeTable table in the AOT.
2. Right-click the Indexes node in the table and select New Index. A new index Index1 is created.
3. Rename the index to AJ_BookTypeIDIdx
4. Drag the field AJ_BookTypeID to the index AJ_BookTypeIDIdx node.
5. In the properties sheet for the AJ_BookTypeIDIdx node, set the property AllowDuplicates to No.


How to: Set a Primary Index
Use the following procedure to set the index created in the previous procedure to be a primary index.
1. In the AOT, locate the AJ_BookTypeTable table.
2. In the property sheet for the table, set the PrimaryIndex property on the table to AJ_BookTypeIDIdx
3. Close the property sheet for the table.
 

Tuesday, April 1, 2014

How to: Create a New Table

Use the following step procedure to create a new table that will store the records for the BookType. There are two fields on the table called BookTypeID (type AJ_EDTBookTypeID), and Name (type Name).
To understand the example scenario - Go here

1. Open a new development workspace.
2. In the AOT, expand the Data Dictionary node.
3. Right-click the Tables node and select New Table. A new Table called Table1 is created.
4. Right-click Table1 and select Properties.
5. Modify the property Name to AJ_BookTypeTable
6. Modify the property Label to "Types of Books"
7. Close the property sheet.
8. Press Ctrl-D to open another AOT. Ensure window is not maximized by clicking the restore down button to enable you to view both AOT windows.
9. Expand the Data Dictionary node.
10. Expand the Extended Data Types node.
11. Locate the AJ_EDTBookTypeID EDT.
12. Drag the AJ_EDTBookTypeID EDT to the Fields node of the AJ_BookTypeTable table. A new field called AJ_EDTBookTypeID is created.
13. Right-click the AJ_EDTBookTypeID field and click Properties.
14. Note that the Extended Data type for this field is set to AJ_EDTBookTypeID
15. In the Name property, set the name of the field to AJ_BookTypeID
16. Close the property sheet.
17. Locate the Name EDT in the second AOT.
18. Drag the Name EDT to the Fields node of the AJ_BookTypeTable table. A new field called Name is created.
19. Save your changes to the table. When changes to a table are saved, Microsoft Dynamics AX automatically synchronizes the changes made within its Data Dictionary with SQL: this ensures that the definitions for the tables remain consistent at all times.
 

How to: Create a New Extended Data Type

Use the following procedure to create a new EDT that will define how the Id of the BookType is stored.
To understand the example scenario -
Go here


1. Open a new development workspace.
2. In the AOT, expand the Data Dictionary node.
3. Right-click the Extended Data Types node.
4. Select New > String. A new EDT called Type1 is created.
5. Right-click Type1 and select Properties.
6. Modify the property Name to AJ_EDTBookTypeID.
7. Modify the property Extends to SysGroup.
8. Modify the property Label to “Type of Book”.
9. Close the property sheet and click Save in the AOT to save your changes.
10. On the Database Synchronization dialog, click Yes. This will take a few minutes to complete.