Search through blog..

Sunday, February 17, 2013

Walkthrough: Adding a Page to Navigation [AX 2012]

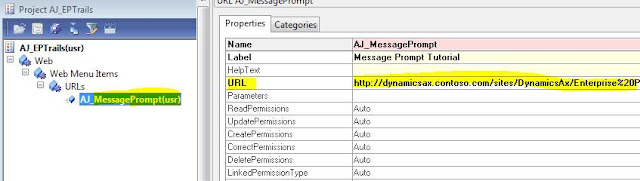
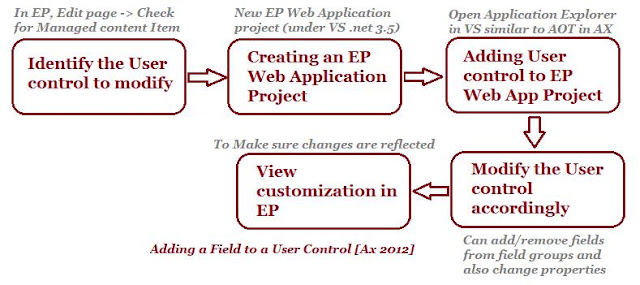
When you create a page in Enterprise Portal, you will add it to the navigation to enable users to access it. This walkthrough demonstrates how to add the Tutorial_MessagePrompt page to the Quick Launch navigation for the Sales module site in Enterprise Portal. It illustrates the following tasks:
1.      Creating a Web Menu Item
2.     Modifying the Quick Launch Menu
3.     Viewing the Page in Enterprise Portal
Prerequisites to complete this walkthrough: 1.      Microsoft Dynamics AX 2.     Enterprise Portal

#1: Creating a Web Menu Item
A web menu item points to a specific page in Enterprise Portal. You must create a web menu item for each page that you will be adding to the navigation.

To create a web menu item:
1.      In the AOT, expand the Web node, and then expand the Web Menu Items node.

2.     Right-click URLs, and then click New URL.

3.     Right-click the new URL that you created in step 2, and then click Properties.

4.     Set the Name property to Tutorial_MessagePrompt Prompt.

5.     Set the Label property to Message Prompt Tutorial.

6.     Specify the URL property, which has the following form: Module/Enterprise%20Portal/PageName.aspx. The Tutorial_MessagePrompt page is found in the main Enterprise Portal site, so it does not have a Module in its path. The value you must enter for the URL property to access the Tutorial_MessagePrompt page is: http://<<server>>/sites/DynamicsAx/Enterprise%20Portal/Tutorial_MessagePrompt.aspx

7.     Right-click the new URL item, and then click Save.

#2: Modifying the Quick Launch Menu
To add menu items to the Quick Launch area for a module site, you must first determine which web menu resource is being used for the Quick Launch.
To modify the Quick Launch menu:
1.      In the AOT, expand the Web node, expand the Web Modules node, and then expand the Home node.

2.     Right-click the Sales node, and then click Properties.

3.     Examine the QuickLaunch property. It is set to EPSalesQuickLaunch. This is the web menu resource that defines the menu items displayed in the Quick Launch area for the Sales module site. You will add the new web menu item that you created to this web menu.

4.     In the AOT, expand the Web node, and then expand the Web Menus node.

5.     Locate and expand the EPSalesQuickLaunch node.
Right-click the Common node. Click New, and then click Menu item. A new menu item will be added at the end of the list.

6.     Right-click the node for the new menu item, and then click Properties.

7.     Use the drop-down list for the MenuItemName property to select the Tutorial_MessagePrompt menu item you created in the previous procedure.

8.     In the AOT, right-click the EPSalesQuickLaunch Web menu, and then click Save.  

#3: Viewing the Page in Enterprise Portal
After you have added the menu item to the Quick Launch, you can view it in Enterprise Portal.
To view the page in Enterprise Portal
1.      Using a web browser, open Enterprise Portal. The typical URL to access Enterprise Portal is: http://<server>/sites/DynamicsAx/
Substitute the name of the server on which Enterprise Portal is installed.

2.     Click Sales on the top link bar to display the Sales module site.

3.     In the Quick Launch, examine the last item in the Common group. The Message Prompt Tutorial item should be listed.

Important : Sometime you might not see the new item in the list, the caches for Enterprise Portal may need to be refreshed.
And for this, you just have to go to Home and press “Refresh AOD” in the quick launch menu and then you should be able to see your new menu.

4.     Click the Message Prompt Tutorial item to open the Tutorial_MessagePrompt page.

Information collected from: Link

Thursday, February 14, 2013

Walkthrough: Adding a Field to a User Control [AX 2012]

In this example, the customer page in EP displays detailed information about a customer. The User Control displayed in a User Control web part is used to display the data on the page and the AxForm is the main component of the User Control used.

A common customization is adding/changing the fields that are displayed in an entity overview page.
This walkthrough demonstrates how to add a field to the first group that appears on the View customer entity overview page. The below figure illustrates the tasks be performed:


Prerequisites:
Basic prerequisites to be checked and available before proceeding for the walkthrough are:
1. Microsoft Dynamics AX
2. Enterprise portal
3. Visual Studio 2010
4. Visual Studio Tools installed (Ax Installation)
5. EP Administrator rights

#1: Determining the User Control to Modify
Before you can modify the fields displayed on the View customer page, you must determine which User Control is being used for that page.


To determine the User Control to modify:
  • Using a web browser, open Enterprise Portal. << http://<servername>/sites/DynamicsAx/ >>
  • Click Sales on the top link bar, this displays the All Customers list page. Select one of the customers in the list, and then click View. The View customer page with customer information is displayed.
  • In the ribbon, display the Page tab.
    Click the Edit Page command.

  • Locate the View customer web part in the middle column. In the drop-down menu for this web part, click Edit Web Part. The drop-down menu is the small arrow found on the upper-right corner of the web part.

  • In the list of properties for the web part, locate the Managed content item property. It is set to CustomerOverview, which is the User Control that is being displayed in the web part. This is the User Control that will be modified.
  • Click Cancel to close the list of web part properties.
  • Click Stop Editing to return to the View customer page. Close the page.
#2: Creating the EP Web Application Project
Visual Studio is used to modify User Controls for Enterprise Portal.

To create the EP Web Application project:
1. Start Visual Studio. To make sure you start Visual Studio with administrative privileges, right-click the shortcut for Visual Studio and then click Run as administrator.
2. In the File menu, click New, and then click Project.
3. In the New Project window, select .NET Framework 3.5 as the framework version to use.
Important: For this release of Microsoft Dynamics AX, the EP Web Application project must target the .NET Framework 3.5 to work correctly.

4. In the Installed Templates list, select Microsoft Dynamics AX. If you do not see this project template, make sure that you have Visual Studio Tools for Microsoft Dynamics AX installed.
5. Choose the EP Web Application template.
6. Specify a name for the project, and the location of the folder where you want to store the files for the project.
7. Click OK to create the project.

#3:Adding the User Control to the EP Web Application Project
You must add the User Control to the EP Web Application project so that you can modify the User Control's properties.

To add the User Control to the EP Web Application project
1. In the View menu in Visual Studio, click Application Explorer.
2. In the Application Explorer, expand the Web > Web Files > Web Controls node.
3. In the Web Controls list, locate the CustomerOverview control.
4. Right-click the CustomerOverview control, and then click Add to project. The control and several related controls are added to the project.
5. Close the Application Explorer.

#4: Modifying the User Control
Use Visual Studio to make changes to the User Control.

To modify the User Control
1. Locate the CustomerOverview.ascx component in Solution Explorer.
2. Right-click the CustomerOverview component in Solution Explorer, and then click View Designer.
3. After a few moments, you will see several components in the control layout. The AxDataSource component is used to access data for the customer overview page.
The AxMultiSection component contains all of the expandable sections that you see in the View customer page.
The sections contain AxGroup components, which are used to display fields.
4. Click the Customer AxGroup component directly in the layout to select it. This component contains the fields that are displayed at the top of the General section of the View customer page.

5. To modify the fields that are displayed in the group, use one of the following methods:
a. Display the context menu at the upper-right corner of the AxGroup control in the layout. Click Edit Fields to display the Bound Field Designer.
-or-
b. Locate the Fields property in the Properties list. Click the ellipsis button to display the Bound Field Designer.

6. The Selected Field list contains the fields that appear in the group. Only the AccountNum field is included. In the Available Fields list, select the OrderEntryDeadlineGroupId field. Click Add Field to add this field to the list of fields that will be displayed in the group.
7. Make sure that the OrderEntryDeadlineGroupId field is selected in the Selected Field list.
8. In the BoundField Properties list, locate the HeaderText property. Set the value of this property to Order entry deadline:.
9. Click OK to save the changes to the list of fields for the AxGroup.

10. In the File menu, click Save CustomerOverview.ascx to save the changes you made to the User Control. The changes are exported automatically to the AOT. The updated User Control is also deployed to the Enterprise Portal server.

#5: Viewing the Customization in Enterprise Portal
After the field has been added to the User Control, you can view it in Enterprise Portal.

To view the customization in Enterprise Portal
1. Using a web browser, open Enterprise Portal.
2. Click Sales on the top link bar. Display the All Customers list page. Select one of the customers in the list, and then click View. The View customer page with the customer information is displayed. You will see the customer details, including the Order entry deadline field that you added.


Wednesday, February 13, 2013

Document management in AX 2012

In Dynamics Ax 2012, you can attach documents to specific records. This can be done by clicking the "Attachments" button on the Ribbon for many forms. Below is a screen capture for Workers form:

The picture isn't clear, this is just to give an idea where you should possibly look for Attaments button.
 
But before you go ahead with Document attachments, you need to setup few things listed below:
  1. Activate Document management
  2. Set up Archive Directory - place to store the documents
  3. Create required Document types
  4. Use Document management to attach files to records in any Dynamics Ax Form.

Activate Document Management:

Complete the following procedure to activate document management.
  1. Click File > Tools > Options
  2. Click General and then expand the Miscellaneous FastTab. 
  3. Select the Document handling active check box. 
  4. Select Show attachment status to highlight the Document handling control on the status bar
    and Select Action Pane when you select a record that has documents references.


Set up document Archive Directory:
Complete the following procedure to set default document archive directory.
  1. Click Organization administration > Setup > Document management > Document management parameters.
  2. In the General area of the form, in the Archive directory field, enter the path to the archive directory.
  3. Click Number sequences, and select the ID reference.
  4. In the Number sequence code field, select the number sequence code to use for naming your documents.

Note: You can select an alternative archive directory for each document type in the Document types form. If you change the archive for your documents, existing document references will not work unless you have already copied all existing documents to the new archive.

Create required Document types:

The document can be attached if and only if the file is of any type that is set up in the Document types form.

Follow the below steps to create a new document type:
  1. Click Organization administration > Setup > Document management > Document types. 
  2. Press CTRL+N to create a new document type.
    or you can click the "New" button.
  3. In the Type field, enter a code for the document type.
    This Type field is shown while adding documents to records, so recommended to have a descriptive name here.
  4. In the Name field, type a descriptive name for the document type.
    More description if needed.
  5. In the Class field, select the type of document to create.
    To specify which class do you want the new document type to fall in.
  6. In the Group field, select a group for the document type.
    Choose among the pre-defined groups avaliable.
  7. Close the form to save your changes.


Using Document management:
You can actually perform any of the below actions:
  1. Create a new document
  2. Create a Copy of an existing document
  3. Copy to clipboard to copy the document elsewhere in the System
Below are examples of how to do it, and are performed on Prospect details form (Sales and marketing module)

Create a document
  1. Click Sales and marketing > Common > Prospects > All prospects.
  2. Select the prospect record that you want to create an attachment for or attach a document to.
  3. Click Attachments to open the form.
  4. Press CTRL+N to create a new document.
  5. Select the document type in the Documents form and then click OK.
Note: The document icon in the Prospects form changes from an empty sheet of paper to a book. This indicates that there are documents attached to the prospect record.
 
You can create documents for other users by selecting their user names from the list in the Author field. You can also transfer a document to another author in the Author field.

Copy a document
  1. Click Sales and marketing > Common > Prospects > All prospects.
  2. In the Prospects form, select the prospect record from which you want to copy a document.
  3. Click Attachments to open the Documents form.
    Verify that the document attached is a type that can be opened, such as a Microsoft Word file type or a Microsoft Excel worksheet.
  4. Click Copy.
  5. In the Description field, update the description of the newly copied document.
Copy a document to the Clipboard
  1. Click Sales and marketing > Common > Prospects > All prospects.
  2. In the Prospects form, select the prospect record that has the document that you want to copy to the clip board.
  3. Click Attachments to open the Documents form.
  4. Click Copy to clipboard. The active document is now copied to the Clipboard and can be pasted into any file that accepts text (such as email or a document).
  5. Press CTRL+V to paste the copied document into the destination.
Note: The copy-and-paste procedure creates a copy of the selected document in the file system but does not maintain any connection to the document management system of Microsoft Dynamics AX. No new document identification is created, nor is the copied document attached to any record.

Information collected from: http://technet.microsoft.com/en-us/library/aa549988.aspx

Thursday, February 7, 2013

How to solve Error: Cannot create file mapping in Ax2012 Enterprise Portal

Sometimes a perfectly fine, up and running Enterprise portal (Role center) will stop working and throw the below error.
Error Message: "An unhandled error has occurred. To view details about this error, enable debugging in the web.config file or view the Windows event logs. Go back to site."


You will generally get an error message like "Unhandled exception has occurred" or "An error has occurred. Contact your administrator for further assistance" on the Enterprise portal site or on the Ax Thick client (for role centers). But to have the understanding of the actual error, look into the Event Viewer (eventvwr).

Solution:
The solution that worked for me is quite simple to implement and you can give it a try even though you have some other issue related to Enterprise portal.


  1. Go to System administration > Setup > Enterprise portal > Deployments
  2. In the opened dialog, verify if the Deployment target is pointed to the correct folder (typically DynamicsAx)
  3. And then click Deploy button, which will updates all static files, web controls, images, and proxy files for a specific Enterprise Portal site and also deploys new page definitions.
This will take little time but proved effective everytime for me. Hope this helps. Good luck !!

Tuesday, February 5, 2013

Enable users to access Enterprise Portal [AX 2012]

Before you grant users access to Enterprise Portal, you must complete the following tasks:

1.      Verify that you have the appropriate permissions to install and configure Enterprise Portal.

2.     Verify that you are listed as a site administrator for Enterprise Portal in SharePoint.

3.     Install Enterprise Portal.

4.     Deploy Enterprise Portal.

5.     Configure security for Enterprise Portal.

Adding users to SharePoint:

You must add users or groups to Microsoft SharePoint 2010 products before users can access Enterprise Portal or view content in Role Centers.

1.      Open the Enterprise Portal site in a Web browser. By default, the URL is http://server_name/sites/DynamicsAX.
 

2.     On the menu bar, click Site Actions > Site Permissions.


3.     Click Grant Permissions.

4.     In the Users/Groups text box, enter the name of each user or group, and then click Check Names.

5.     Under Grant permissions, click the permission level that you want to set. At a minimum, users and groups must have Read permissions.

o   If you do not want users to be able to personalize their Role Center pages or modify the shared view of a Web part, assign Read permissions.

o   If you want users to be able to personalize their Role Center pages and modify the shared view of a Web part, assign Contribute permissions.

o   If you want users to be able to personalize their Role Center pages, but you do not want them to be able to modify the shared view of a Web part, assign Read permissions, and then configure the set of Read permissions in SharePoint. From the Enterprise Portal site, click Site Actions > Site Permissions > Permission Levels. Click the Read permission link. Under Personal Permissions, select the options that you want.

o   If you want users to be able to filter reports using a custom parameter value, assign Design permissions.

For more information about how to work with reports, see Manage reports.

o   If you want users to be able to add and modify indicators and key performance indicators (KPIs), assign Design permissions.

6.     Click OK.

Internal users can now view Enterprise Portal in a Web browser. If you granted users access to an Enterprise Portal with Role Centers, then those users can now view content in their Role Centers. Page access and the content that is displayed in Enterprise Portal and Role Centers are automatically trimmed according to both the user's security role in Microsoft Dynamics AX and the permissions that you specified in SharePoint.

Note: If users are prompted to enter their credentials when they view the Enterprise Portal site, they can automate authentication by adding the site to the list of local intranet sites. In Internet Explorer, click Tools > Internet Options > Security > Local intranet > Sites

Friday, February 1, 2013

Help Server Troubleshooting (Ax 2012)

Though installation of Dynamics Ax 2012 Help server was quite easy, the Help server configuration ate up more time for us.

Problem: When trying to initiate a help request from client by pressing F1 we could only see an error web page “503: Service unavailable”

Errors we faced while troubleshooting:
  1. Opens up browser and shows "Error 503: Service unavailable"
  2. Unable to contact server http://<ServerName:Port>/DynamicsAXHelpServer/HelpService.svc
  3. Opens up browser and shows “No Results” (requested topics cannot be found
Troubleshooting to understand the problem and fix it:
  1.  Open the below link http://ServerName:Port/DynamicsAX6HelpServer/Content/Microsoft/EN-US/UserHelp/6a9bdc61-b19e-4cea-8890-805a4ccba8b2.htm?DocumentSet=UserDocumentation&ContentLanguage=en-us&ResourceLanguage=en-us in Internet Explorer and see if you can retrieve help files.
    This is basically to check if Help server is working for one particular form. If this opens the Help site then that means all the Indexs are not calculate yet and Help server is working on for some links.
  2. As Windows Search Service is needed for Help server to run, check if it is up and running (from services.msc)
  3. Verify that Indexing options shows complete for content directory. (Control Panel > Indexing options) And wait till the indexing is finished if it is InProgress. (shows Indexing is slow because of User interference - If Indexing is in progress)  
  4. Verify that the indexing options for File Type htm and html are set to “Index Properties and File Contents (click Advanced button) 
  5. Verify basic verification, but most effective.
    Make sure that you have used the account used for NET Business Connector proxy account for the AOS.
    If you have not used the same account, then go ahead and uninstall the present Help server componenet and re-install again with the account used for Business Proxy.
If you have everything mentioned above checked and running, then you should be able to see Help server working just fine again.


Other Troubleshooting tips I found while searching for fix of our issue:
  • If you get the below error when trying to open Help server link in IE Could not load type 'System.ServiceModel.Activation.HttpModule'then you might need to apply following KB article: http://support.microsoft.com/kb/2015129
  • If you find that the help server content is installed in directory of SharePoint ie: C:\inetpub\wwwroot\wss\VirtualDirectories\8082\DynamicsAX6HelpServer\Content the Search Service does not return correct files and the Help Server does not work correctly.
    Then the workaround could be to uninstall Help Server and install it on Web Application which physical path points to ie: C:\inetpub\wwwroot\8082\DynamicsAX6HelpServer\Content
  • Also if you might want to check the Advanced properties of Directory Content for the property “Archive and Index attributes” to be set up to “Allow files is this folder to have contents indexed in addition to file properties”

Other Related Links:
About Ax2012 Help server and how to install: http://ajstudi0.blogspot.com/2013/02/about-ax2012-help-server-and-how-to.html

About AX2012 Help Server and how to install

Microsoft Dynamics AX Help is a client and server based system that distributes and displays documentation.
  1. The Help client is the Help viewer application that requests and displays documentation and gets installed with the Microsoft Dynamics AX client application.
  2. The Help server responds to the Help viewer request for documentation. In addition, the Help server stores the files that contain the Help documentation.
Important: This Server-client Help system does not supply Help documentation for Enterprise Portal. You will have to install Enterprise Search to support help documentation for EP.

Other information about Ax 2012 Help server which is good to know:
  • Typically, you can initiate a help request from either the client or developer workspace by pressing F1 /button / via command. 
  • The client identifies the Help topic to retrieve. To identify the documentation for the form from where Help is initiated, the documentation has an ID property that has the same value as the ID of the form.
  • The client retrieves the URL of the Help web service. The first time that you request help, the client contacts the AOS to retrieve the URL of the help web service. The client then caches the URL and uses the cached URL for additional help requests.
  • The client calls the Help viewer. If the Help viewer is not running, the viewer is started. The call to the Help viewer includes the URL of the help server and the ID of the form.
  • URL can be updated/modified under path AX2012 > System Administration > Setup > System > Help system parameters.

How to Install the Help server:
  1. Start Microsoft Dynamics AX Setup. Under Install, select Microsoft Dynamics AX components.Advance through the initial wizard pages.
  2. On the Select installation type page, click Custom installation, and then click Next.On the Select components page, select Help Server, and then click Next.
  3. Check for prerequisites, When no errors remain, click Next.
  4. On the Connect to an AOS instance page, enter the name of the computer that is running AOS and other port. Click Next.Note that, If you entered AOS information for other Microsoft Dynamics AX components that you have installed on this computer, this screen is not displayed.
  5. On the Configure a Web site for Help Server page, select the web site that you have chosen to host the Help server. Verify that the location of the physical directory for the web site is displayed. Click Next.
  6. On the Specify the Help Server account page, enter a domain user account and password. This account must be the same as the .NET Business Connector proxy account for the AOS, and it must be a user in Microsoft Dynamics AX. This should be a service account that does not expire. Click Next.
  7. On the Language and content selection page, select the Help languages and content types to install. EN-US must be installed, and is checked by default. Click Next.
  8. On the Prerequisite Validation page, resolve any errors.
    One possible error which you might observe when you have SharePoint / Enterprise portal already installed in the machine is shown below:


    Error: Web site (Help Server) is shown because the Default web site is not started. And this could be because SharePoint installation has taken over the Port 80 and kicked off the Default web site.

    Solution: Go to IISManager (inetmgr) and then Edit bindings for the Default site to change the port number from 80 to something else (say 81).
    After doing so, you can start the Website. This should resolve the issue shown above.


  9. When no errors remain, click Next.
  10. On the Ready to install page, click Install.After the installation is complete, click Finish to close the wizard.
After the Microsoft Dynamics AX Help files are installed, they must be indexed by Windows Search Service before you can view them. Depending on system load and the number of files, it may take up to an hour for indexing to finish.
More information on how to Install the help server [AX 2012]


Other Related links:

Troubleshooting issues with Help server configuration can be found here:

Steps to install Enterprise Search to support help documentation for Enterprise Portal can be found here: