A Simple example of migrating data using AX 2012 Data Migration Framework
This topic explains in detail and illustrates a simple example of migration of data using the Ax 2012 Data migration framework.
Before you begin, your environment must include the following components:
 For an End-to-End scenario of Data Migration, the flow would be some thing like:
Step #1: Setup of Data migration framework:
The DMF requires a shared directory that the service account must have read and write access to. This can be provided by:
For files, you must define whether the data is coming from a list that is delimited (comma-separated (CSV)) or is fixed width.
Step #2: Is to Identify the entities to migrate to Ax2012
For this we need to go to Target entities (form). This shows the list of entities shiped with Ax2012 DMF. We can also create a custom entity.
Step #3: Creating Processing group Processing group is similar to definition groups in standard Ax while Import/Export of data. Processing group represent a list of entities that should be migrated together. So to proceed further we need to create a Processing group and add entities to it as shown below:
To get data from file to staging table,
Step #5: Verify Staging data and Copy data to Target (Ax2012)
Observe the above screenshot, in the 'Execution history (form)' there are three buttons enabled, View staging data, Copy data to target and Log respectively. These play the role of verifying staging data and copying data from staging to Target.
Step #7: Final step is Staging cleanup
Staging cleanup will delete the data from staging table once the data is been migrated to the target. To do this follow below steps.
Internal Links:
Simplified briefing about Ax 2012 DMF
Step by Step DMF Installation process
Simple example of DMF usage
For Troubleshooting DMF installation issues
Known Issue with DMF #1
Known Issue with DMF #2
Best practises for DMF usage
Youtube link for a very nice related video:
http://www.youtube.com/watch?v=vbMrqE7sZAs
Before you begin, your environment must include the following components:
- A running version of Microsoft Dynamics AX 2012, along with Ax 2012 Data migration framework installed and running.
- Access to demo files which are copied to Program files during installation of Ax 2012 Data migration framework. (typically under path: "<root>/Program Files/Microsoft Dynamics AX 2012 Data Migration Framework Client Components (Beta)/DemoFiles")

- Setup of Data migration framework
- Data migration framework parameters (form) --> to provide share folder path
- Source data fomats (form) --> to provide details about source data format
- To Identify the target entities.
- Target entities (form)
- create a custom entity for migration (form)
- Source to staging
- Processing group (form)
- Staging to Target
- Processing group > Execution history (form)
- Staging cleanup
- Staging cleanup (form)
Step #1: Setup of Data migration framework:
The DMF requires a shared directory that the service account must have read and write access to. This can be provided by:
- Open Data Migration Framework > Setup > Data migration framework parameters (form)
- Enter a share in 'Location of shared directory' and then click Validate.
If the DMF service account has write access to the share, the validation icon turns green.

For files, you must define whether the data is coming from a list that is delimited (comma-separated (CSV)) or is fixed width.
- Open Data Migration Framework > Setup > Source data formats (form)
- Click New and provide a name and description for the source.
- Verify that the source type is File.
- Set the following general settings for files.
- File format => DelimitedSelect Delimited or Fixed width. Delimited formats use a specific character to separate fields. Fixed width formats set aside a specific number of characters for each field.
Note: The options for Delimited and Fixed width are the same. Field widths are defined for each entity, not in the data format. - First row header => trueSelect this option if the first row of your data files contains header information.
For fixed width formats, you can specify delimiter characters to define the values in the header row, if there is a header row. - Row delimiter => {CR}-{LF}Select the delimiter for rows.
{CR}{LF} if The header row is delimited by a carriage return/line feed combination
{CR} if The header row is delimited by a carriage return.
{LF} if The header row is delimited by a line feed.
Semicolon {;} if The header row is delimited by a semicolon.
Colon {:} if The header row is delimited by a colon.
Comma {,} if The header row is delimited by a comma.
Tab {t} if The header row is delimited by a tab.
Vertical bar {|} if The header row is delimited by a vertical bar. - Column delimiter => Comma {,}
Select the delimiter for columns. See the description of the Row delimiter parameter for the available values. - Text qualifier => "Is used in case your file contains a column of type string, whereas, the value of that column might contain {,} column delimiter. For example, if your organization names include commas, but the value that you are using for a column delimiter is a comma, then you should enter another value to delimit text values. In this example, you might want to use a quotation mark ".
So here, we need tEnter a value to use to delimit text values in a row that may conflict with the value you are using for a row or column delimiter. - Set the following general parameters for regional settings.
- Code page => 1252
Specify the code page for non-Unicode text. - Unicode => false
Select this option to indicate whether to use Unicode. - Language locale => en-us
Specify the locale to provide language-specific information for ordering, and for date and time formats. - Set the following general parameters for multiple value separators.
- Multiple value separator => ;Optional: Set a value to delimit fields that contain multiple values that are associated with a single record, such as email addresses, phone numbers, or URLs.

- Click Application to set the parameter values to Dimensions and Name sequence.
- Set the following general parameters for dimensions.
- Dimension code => CostCenter; Department; PurposeAs you know inside Ax 2012, Dimension is represented by a 64 bit Integer, however for an end user it is still a combination of string values. So we need to select the format in which user needs to send the Dimensions.
This is Optional: Specify the list of financial dimensions that are part of the source file. The codes for the financial dimensions are pulled from Microsoft Dynamics AX. - Chart of accounts delimiter => -
Delimiter seperating the individual dimensions. The delimiter between financial dimension values. - Dimension format => CostCenter-Department-Purpose
This is a predefined format of the dimension, based on the financial dimensions and delimiter that you selected. This field is automatically populated. - Set the following value for name sequences


Step #2: Is to Identify the entities to migrate to Ax2012
For this we need to go to Target entities (form). This shows the list of entities shiped with Ax2012 DMF. We can also create a custom entity.
Step #3: Creating Processing group Processing group is similar to definition groups in standard Ax while Import/Export of data. Processing group represent a list of entities that should be migrated together. So to proceed further we need to create a Processing group and add entities to it as shown below:
- Open Processing group (form) from Data migration framework > Common > Processing group
Create a new record with - Group name => AR
- Description => Accounts receivable
Save record to enable "Entities" button.
- The next step is to add entities to the newly created processing group. Click button "Entities" to open up a new form 'Select entities for processing group' and now
- Add Entity name => Customer
can choose from the list of entities shown in the look up based on requirement. - Add Source data format => CSV
this indicates the data format in which data is provided from Source. In our case, we will choose CSV which we create above. - Add Sample file path => "<root>/Program Files/Microsoft Dynamics AX 2012 Data Migration Framework Client Components (Beta)/DemoFiles/Delimited/CustomerEntity_ContactInfo"
Sample file would contain the coloumns which are part of customer file and may contain some data.
- The next step is to map the above file to the staging table. To do this, we need to click the button "Generate source mapping". This will read the column names from the file and automatically map them with the columns in the Staging table.
An Infolog will pop up with a most likely message 'Mapping has complete successfully'. If you get any errors, you will have to fix them before proceeding further.
- If you want to modify the mapping or verify the Source mappings. You can click the button "Modify Source mapping". It will open up a new form.
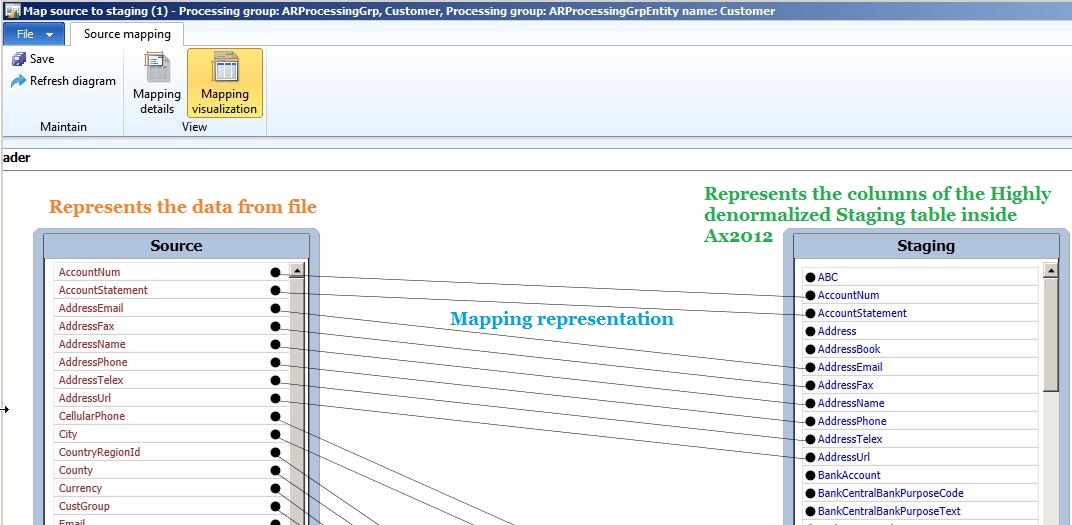
Inside 'Map source to staging' form, there are two Views, - Mapping visualizationThis is the graphical representation of Source to Staging table mapping. Here on the left side, Source block represents the data from file. And on the right side, Staging block represents the staging table inside Microsoft dynamics Ax2012. And mappings are shown as a line drawn from Source to staging.

- Mapping details
Whereas Mapping details is the X++ grid equalent to the visualization. Again on left side, Source field represents the data from the file. And on right side, Staging field representing columns from the staging table.
- Assuming the mapping is correct, and now we can actually preview how the data will be entered in the Staging table. For this, we can click the button "Preview source file". This will show the preview (without actually moving data from file to staging) in the preview pane in 'Select entities for processing group'form. Here we can verify if the data is appearing as expected.

- After verifying the mapping and preview, close the form 'Select entities for processing group'


To get data from file to staging table,
- On the 'Processing group' form, click button "Get staging data"|
This will pop up a Microsoft Dynamics Ax Dialog box, asking for a job id which is basically to schedule a job to get data for that particular processing group. Enter any meaningful values as shown in the picture below and click Ok.
- A new form 'Staging data execution' is shown with the details like, Entity name, File path. Here, the option of changing the file path is provided. And in case you change the file path, the option to preview the data in the stagging table is also avaliable. This is achieved by clicking the button "Preview".
- Once everything is verified and you are ready to start migrating data from file to staging table, Click button "Run"
You will be shown a dialog, providing you the option to select whether the processing should be done using batch or non-batch. Let's consider non-batch for the demo purpose. So click "Ok"button.
- If there are no errors and the staging records have been updated successfully. You will recieve an infolog with details about the records inserted or updated.

- Once this is done, the other buttons on the processing group will be enabled automatically. For example, by clicking the button "Execution history". We can see all the details related to a particular Job ID.
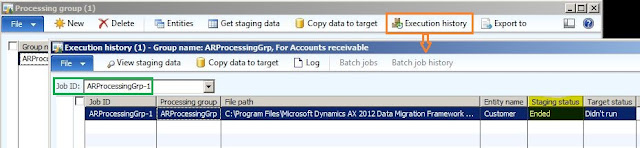


Step #5: Verify Staging data and Copy data to Target (Ax2012)
Observe the above screenshot, in the 'Execution history (form)' there are three buttons enabled, View staging data, Copy data to target and Log respectively. These play the role of verifying staging data and copying data from staging to Target.
- In the Execution history form, click button "View staging data" to open up a new Dynamic form with the Entity name as the title. The form lists out all the 6 records entered into staging table.

- Now the user can validate data in the staging table. And to make sure the data is clean, i.e, to make sure that all the references are correct, we can always click "Validate" button - This is validate the current record or the selected records.
If you want to validate all the records at the same time, press button "Validate all". This will verify whether all the references for the staging data in the target are correct, if they are not, the system will warn you regarding them with details.
And in case of warning, you need to correct the references to proceed further. - For the demo, I will click button "Validate all" and should get an infolog message saying validation is successful.

- Close the form 'DMFCustomerEntity: Customers'
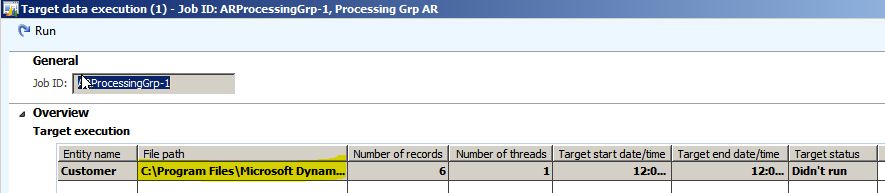
- Next, we need to copy the data from Staging to Target. For this we have a button "Copy data to target". Click it.
A new dialog form opens up with options to select Job ID, Run for/Criteria. For the demo purpose and also as we need to migrate all the 6 records from Staging to Target, we will choose Run for => All.
- After click "Ok", to open up a 'Target data execution' form which will show the details of the entity update for Target execution.

- Now click button "Run" to pop up a dialog form enabling us to choose for either Batch processing or non-batch processing. For the demo, let's consider non-batch.
Just click "Ok" button. - If processing runs without any error, an infolog with number of rows created/updated will pop out.


Step #6: Verify data copied to Target
- To verify Target data, in the 'Execution history' form, click button "View staging data" to open a form which lists the total records targeted for migration.
- Select any desired record and click button "Target", this will open the actual Customer form with the selected record. This way we can actually validate whether the data from Staging table is properly inserted into the Target tables.

- Now after validation, we can say that the Data from File is successfully migrated to Target (Ax2012) using intermediate staging table.

Step #7: Final step is Staging cleanup
Staging cleanup will delete the data from staging table once the data is been migrated to the target. To do this follow below steps.
- Go to Data migration Framework > Periodic > Staging cleanup, this would open up a dialog with options to provide Entity, Processing group and Job ID.
We will have to provide the values used for Data migration
- After entering valid values, click button "Ok". This is will actually clean the staging table and an infolog pops up.


Internal Links:
Simplified briefing about Ax 2012 DMF
Step by Step DMF Installation process
Simple example of DMF usage
For Troubleshooting DMF installation issues
Known Issue with DMF #1
Known Issue with DMF #2
Best practises for DMF usage
Youtube link for a very nice related video:
http://www.youtube.com/watch?v=vbMrqE7sZAs


Comments